Tuesday 29 August 2023

Frostgrave


This week's games saw a belated beginning to Frostgrave - a game I have looked longingly at for some time. My good friend, Nick, and I embarked on a first game. We played a basic game rather than a scenario and tried to grab as many of the 5 treasure tokens as we could. 


Nick has been busy printing, purchasing and painting a range of terrain suitable for fantasy skirmish. I mixed in a little of my own considerable collection. Nick's use of Renedra fences as walkways worked very well and I think they look better than my coffee stirrer and match stick scratch builds. 


I used a witch with a mix of movement and blocking spells (like mud and fog) with some spells to bolster my minions too. To represent these forces I used my Splintered Fang. Nick used his 3D printed Dwarfs to represent his warband led by a sigilist. He also chose many manipulative rather than directly offensive spells. 

I began by leaping my man-at-arms forward to block a treasure token on Nick's side of the table then ran forward to secure it with my treasure hunter. In the meantime, I used by thugs and thieves to secure objectives on my side (within the watch tower below). Also a ran my crusader forward to fend off any attacks on the central treasure token.


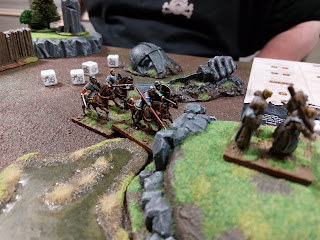
Above shows my strategy to protect my men and slow the Dwarf advance by channeling my witch apprentice powers to turn the earth to mud. I would later shield this side of the table further with a wall of fog. 


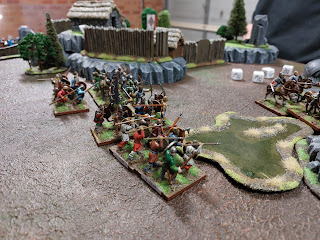
Nick's Dwarfs pass the 'Tree of Woe' and rush forward. My man-at-arms is just visible ready to fend off assault while my other men run off with the treasure. 


Nick was able to open a hole in a stone wall to allow a soldier to clamber through and prevent my escape with a treasure token. This was, not the first, but a tangible sign of impending doom for my witch's cult. A mass of 1's rolled - probably more than 12 on the night - sapping my strength through spell failure and leading to disastrous combat results. My men regularly took 5, 6 or even 7 hits in combat. I lost two treasure tokens I had taken control over - one to a well used Fool's Gold spell (very Dwarfy spell I must add) - and barely got another two to the board edge. 


However, due to repeated combat losses, all of my men had many wounds and were locked in combat that they just couldn't escape from. I wasn't winning and Nick simply held me in combat by refusing to push me back. He just held me there as I lost fight after fight. 

And then ... monsters came on. Directly in my path of escape 2 armoured skeletons marched. Again, I lost many fights and my wizards failed spells to bolster strength. By now my wizard had but 4 health left and my apprentice but 1. While the young witch escaped, the witch was shot then hacked down. 

All evening, I think I won two combats ... and one was against a skeleton. With my wizard dead my warband collapsed at the end of the first game. Not a good start. 


I really did enjoy the game despite my sheer inability to win any combat at all or profit from the really good positions I had gained in the early game. I was a total disaster really. Many soldiers died or were wounded too. The rules seems very good although I must say being helplessly locked in combat once engagement had occurred did - and does - seem quite restrictive. Just running in and pinning the enemy - and keep pinning them (without even fighting) if initiative is won - seems a bit easy to achieve in an otherwise very thoughtful game. Some sort of mechanic to leave combat, even at a risk, would be a good addition by providing an additional decision for players to make. 


ADLG Gauls against Pyrrhus


The following post details two games of ADLG. 
The first was my Pyrrhic army against Ian's Gauls. His choice was quite surprising as he'd long talked about Gauls but for 2 or more years had only ever taken an all elite German army. 


His Gallic army had 6 bases of cavalry and 2 of light horse giving him a strong mounted arm. Otherwise he took the maximum amount of light infantry (slingers and javelins) then the remainder in heavy sword impetuous ord. 

My army consisted of 8 pike - 4 ord + 4 mediocre - and this was the backbone of my force. I had never used mediocre pike and wanted to try this out. Elsewhere my cavalry and light infantry forces were outnumbered but my elite xystophoroi had the edge on his cav. 


Ian oddly deployed his cavalry in a terrain restricted area in three lines. This completely reduced their effect for the game. My lower numbers of cavalry could fend them off in limited space. 


Meanwhile on the open flank, a largely unsupported block of Gallic sword were monstered by a wall of pikes who bore the initial charge then began to grind them to pieces. No Gauls would escape annihilation on this flank. 


My ace was my third command containing light horse, light foot and Samnite medium sword. The light cav with javelin drove away his light troops then the 3 bases of Samnites drove straight up the middle with only 1 peeling off the support my cavalry. 


Three bases of Gallic MC were kept completely at bay by a single base of xystophoroi blocking a gap. 


My cavalry would hold the line (my elite heavy spear died in two rounds to cavalry in a show of lucky dice rolling) allowing the Samnites and pikes to do their job. The cavalry would strike back after early losses to take a Gallic general and a couple of HC bases. Ian never managed to untangle the long conga line of forces he has wedged between marsh and two woods.

And what was the Samnite job? They run up the guts, killed all the light foot, flanked some Gallic heavy sword then sacked the camp. Game over ... Pyrrhus wins. 


The second game saw my flowering of my new love affair with mediocre pike. I played Ptolemaic against the Gauls once more. This time I had 6 bases of mediocre pike and 2 ords. My cavalry was about the same but I employed a death star of an elephant and thracians. 

Tonight was also a game of bluff. My use of terrain and medium troops had led my opponent to believe he knew my army composition. Ian had learnt than medium foot are just wonderful so employed a command of mediums. I just stacked heavy foot, decent cavalry, some 2 bases of light cav + 2 LI then a death star and a single base of peltast medium spear (to engage in light terrain or stab cavalry.) We then fought on a plain with limited terrain giving my heavies decent operating space. 


My far right command looked like it had bitten off more Gallic medium sword bases than it could handle but I managed to move some of my CinC's command over to threaten. The elite impact HC were imposing enough to convince both the light foot and medium sword than emerging from the rough ground to support the combats was a bad idea. 


With my 8 strong pike command spread across open ground - against a smaller group of elite heavy sword - I had some imitation legionary foot left often and a base of medium spear peltasts. These gladly advanced onto the medium cav ord in the centre. 

Note, this could never had happened if the Gauls had not chosen to retreat their cavalry when confronted with an earlier Ptolemaic charge. The extra turn allowed me to funnel solid heavy infantry into the fray with cavalry and to bolster my smaller elephant command with flanking cavalry support. 


My pike block took a beating in the initial phases of combat - Ian's dice always run hot, its not speculation just fact - before my overlaps began to count and 2 timely rallies held the line. From this point, despite losing 2 bases of pike, I ground through the Gallic line. 


One base of pike ordinary even broke away slamming into the heavy cavalry. This did not end well for the Gallic nobility. 


Threatened by xystophoroi in the open, the medium Gallic foot did not emerge together rather were slowly fed into the death star. I've never really seen elephants do anything good but tonight my jumbo stomped two Gallic bases into powder. Again, early hot rolls by the Gauls were eventually counteracted by overlaps and positioning of the general. 


The game was really over with the Gauls faced with a continuous line of strong melee troops. My light cav with javelins had again done a sterling job of driving away light troops, the pike had simply worn down then crushed their opponents over time and a smattering of other infantry had started to kill Gallic cavalry. 


With the elephant stomping on heads and thracians cutting into medium Gauls the damage was done. Keeping Gallic troops at bay with unfavourable match ups and draining their command points with 'hail Mary' rally rolls put the nail in the coffin. 
This time ... big Ptolemaic win. 

Tuesday 1 August 2023

The Battle of Dunstan Abbey - A Saga 2nd Battle


After a long repose, a single post has emerged from the mist. A game of Saga finally caught in the sails of my imagination. This week Saga 2nd Edition and "The Siege of Dunstan Abbey." 

6 Points of Vikings attacked - 1 bow levy, 1 huscarl, 4 warriors (8 figs each.) 
AND one skald. 
4 Points of Scots defended - 1 eilte units with mounts (and the option to dismount), 3 units of warriors (again 8 figs each.) 
AND 1 small base of monks + 1 Abbot Dunstan. 


(Above shows Abbot Dunstan before his monastic hovel on the sea blasted coast of Scotland.)

The scenario was hand sculpted. A double 6 roll for either side could cause special effects:
For the Scots ... the Abbot would call upon the Christ god to rouse the waves to fury or revive the deceased. 
For the Vikings ... any group of warriors could knock down a section of wall. 

Two of the Viking units began in boats - rowed at speed M - while the rest started in the swallows of the sea slowing their first movement to S. 

The Scottish monks were setting to work defiling and blessing a nearby pagan burial mound and needed to be rescued at the beginning of the game. 


On Turns One and Two, the Viking used all their saga dice on movement surging from the foam. The Scots used a few of theirs to ride quickly from the defences to encourage the monks to cease their duties and return to the safety of the abbey. The Jarl bawled at the thralls to send a volley of arrows into the horsemen ... but these thudded into stout war boards for no effect. Meanwhile, the horsemen threw the monks bodily over the mounts and returned. The Vikings attempt to slow their effort by burning fatigue to slow movement by to little effect. 


Meanwhile, two units of Northmen warriors and the skald (see the prow of the lead boat on the right) applied themselves to the oars and approached the sea ward side of the palisade. 


There was a turn or two of delay while the Vikings implored Njord for the power to knock down the walls and aid their attacks on the soft Christians. Wading ashore, and letting their boats drift, the Viking to pound at the walls. 


The Abbot implored Christ to swamp these invaders. The sea responded by pulling three Vikings to an ignoble death. 


By Turn 4 the Vikings had moved into position but had not breached the walls. In this time, the Scots - even with less Saga dice - were stacking their board for the eventual assault. The Vikings were forced to repeated use all for theirs for movement. This would later play out into the Scots favour. 


And then the walls crashed down! 


Turn 6 saw two Viking warrior units face a single Scot defender at the wall. The Viking surged over and forced the Scots back after one victory in melee. Over the next few turns, several melees ensued but each coasting the Vikings more and more warriors. It was not a fair trade with the Scots. 


The next image shows the situation at the sea wall later in the game. All units were fatigued and gutted. The skald had many verses of heroic struggle, sacrifice, divine intervention and defeat. These tales would hopefully inspire more invaders from Denmark to attack the shores in coming battles. 


On the other side, the Vikings smashed down the wall in Turn 5 or 6 then struggled to get sufficient men through to attack the defenders. From here continual defeat was the lot of the Vikings. Urged by the vehement cries of Abbot Dunstan the defended stood staunchly. The invaders did not win a single combat as their entreaties to both Njord and Odin were swallowed by a uncaring sky. 


The huscarls hurled themselves forward and fresh warriors were bought up in between hails of arrows but only 5 or 6 Scots defenders fell. With losses mounting, Saga dice supply dwindled to a trickle and the Jarl sounded the horn of retreat. He was fuming at the inability of his men to land blows upon the Scots and knew them was something stronger than stout oak and iron guarding the lives of the defenders. 

It would seem their was more to this womanly Christ god than met the eye ... The Abbot was a powerful foe and must fall if the immortals of Asgard were to be appeased. 

It was time for the skald to weave his honeyed words, espouse the glories of those who perished and went to Valhalla ... and inspire new boatloads of strong oarsmen for the task at hand.